VuePress2搭建自己的博客/官方网站
VuePress2搭建自己的博客/官方网站
VuePress 是一个以 Markdown 为中心的静态网站生成器。你可以使用 Markdown 来书写内容(如文档、博客等),然后 VuePress
会帮助你生成一个静态网站来展示它们。
ps: 以上介绍摘自官网
平常我写博客只需要用markdown写好,然后运行打包命令,就可以将markdown转成html。接着将打包好的文件到nginx服务器上就可以供用户访问了。
快速上手
依赖环境
- Node.js v16.19.0+
手动安装
- 步骤 1: 创建并进入一个新目录
mkdir vuepress-starter
cd vuepress-starter
- 步骤 2: 初始化项目
git init
pnpm init
- 步骤 3: 将 VuePress 安装为本地依赖
pnpm add -D vuepress@next @vuepress/client@next vue
- 步骤 4: 在 package.json 中添加一些 scripts
{
  "scripts": {
    "docs:dev": "vuepress dev docs",
    "docs:build": "vuepress build docs"
  }
}
- 步骤 5: 在 .gitignore 文件中添加下面内容
.DS_Store
node_modules
/dist
.temp
.cache

docs/.vuepress/dist
# local env files
.env.local
.env.*.local

# Log files
npm-debug.log*
yarn-debug.log*
yarn-error.log*
pnpm-debug.log*

# Editor directories and files
.idea/
.vscode
*.suo
*.ntvs*
*.njsproj
*.sln
*.sw?
- 步骤 6: 创建你的第一篇文档
mkdir docs
echo '# Hello VuePress' > docs/README.md
- 步骤 7: 在本地启动服务器来开发你的文档网站
pnpm docs:dev
页面
页面路由
vuepress会读取docs目录下所有的markdown文件转成html。然后通过浏览器的输入对应的路径就可以访问了。
比如下面几个例子,左侧是文件在目录中的位置和文件名,右侧是在浏览器中的路由地址。
| 相对路径 | 路由路径 |
|---|---|
| /docs/README.md | / |
| /docs/index.md | / |
| /contributing.md | / |
| /guide/README.md | /guide/ |
| /guide/getting-started.md | /guide/getting-started.html |
配置
vue-press的目录结构是这样的,config.js就是配置文件了。我们可以在这个文件里面定义vue-press的基本配置和主题配置。
├─ docs
│  ├─ .vuepress
│  │  └─ config.js
│  └─ README.md
├─ .gitignore
└─ package.json
不同的主题提供了不同的页面配置。同一主题对于首页和普通页面也有不同的配置选项。
下面以默认主题为例子来讲述如何配置首页和普通页面。
后面我会以我的这个博客项目为例子讲解配置
git clone https://github.com/qifan777/qifan-blog-vuepress2
首页配置
先介绍一下首页中的哪些元素是可以配置的。在图2中我已经一一标注在上面了。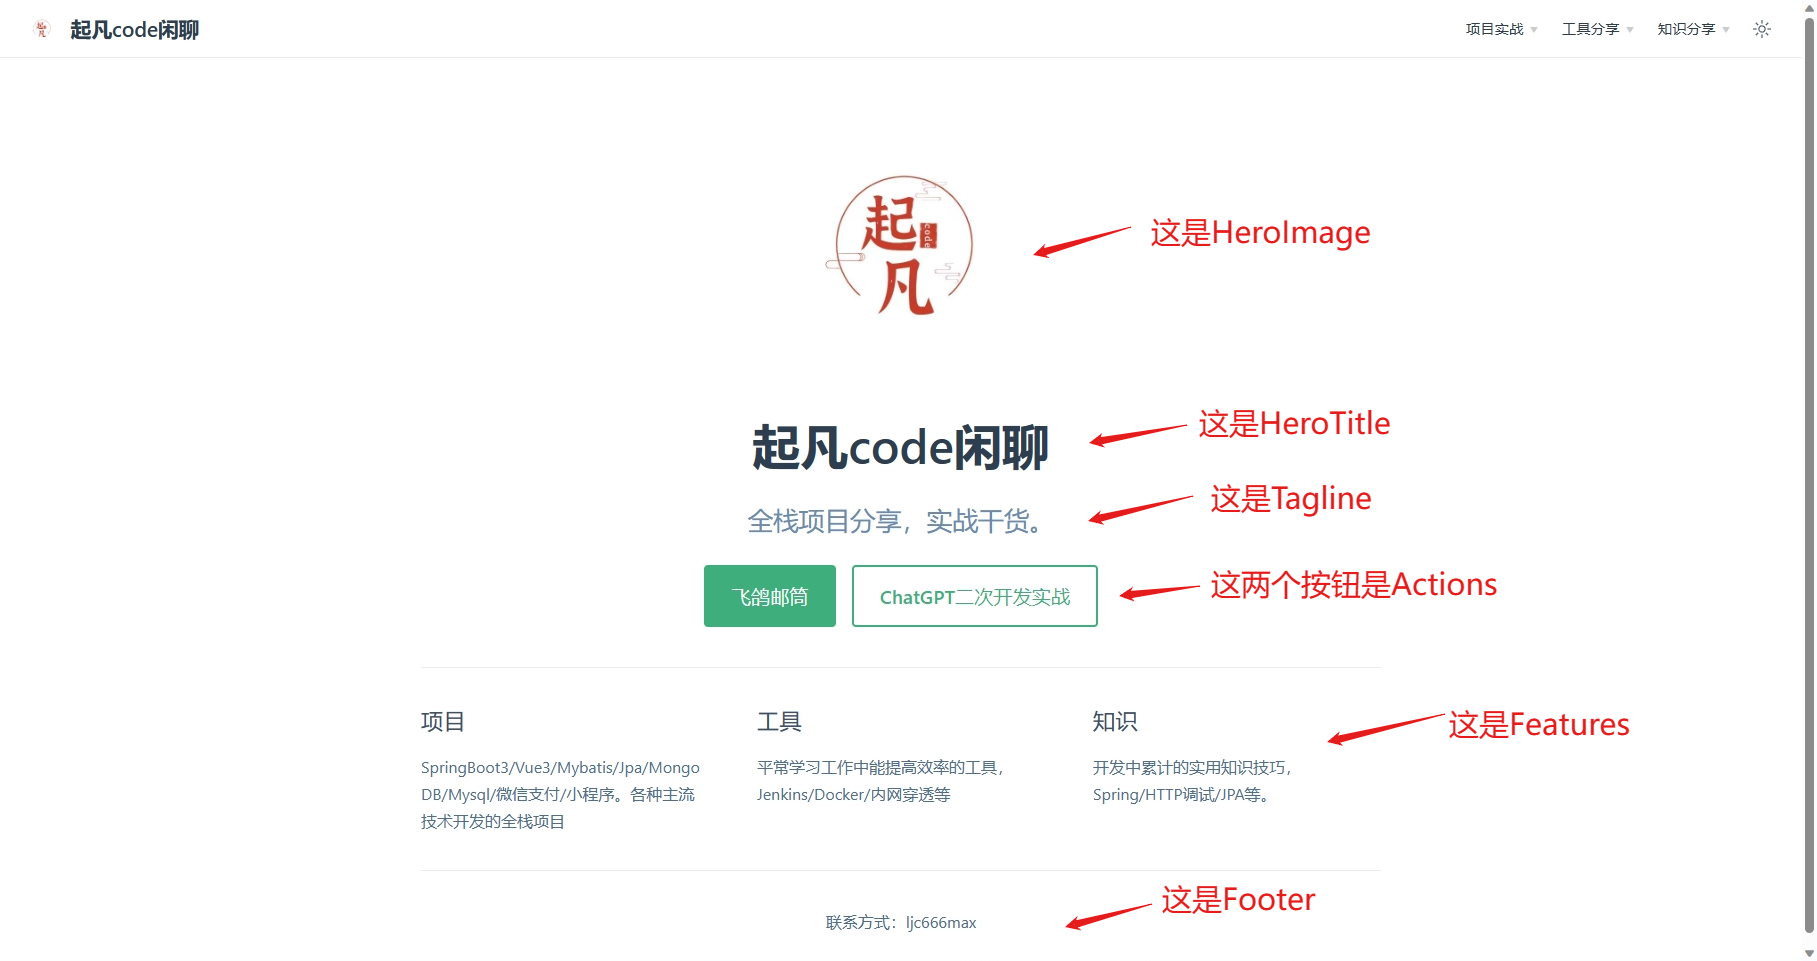
在了解了基本的配置元素后,我们在docs下新建README.md。这个页面就当作我们的首页了,我们在这个页面下输入以下配置。
---
home: true
heroImage: /images/logo.jpg
heroText: 起凡code闲聊
tagline: 全栈项目分享,实战干货。
actions:
  - text: 飞鸽邮筒
    link: /project/post-letter/
    type: primary
  - text: ChatGPT二次开发实战
    link: /project/chatgpt-assistant/
    type: secondary
features:
  - title: 项目
    details: SpringBoot3/Vue3/Mybatis/Jpa/MongoDB/Mysql/微信支付/小程序。各种主流技术开发的全栈项目
  - title: 工具
    details: 平常学习工作中能提高效率的工具,Jenkins/Docker/内网穿透等
  - title: 知识
    details: 开发中累计的实用知识技巧,Spring/HTTP调试/JPA等。
footer: 联系方式:ljc666max
---
其中的home: true代表当前页面设为首页。heroImage: /images/logo.jpg
设置图2中的HeroImage,需要注意的是该图片的存放位置位于/docs/.vuepress/public/images/logo.jpg
。该位置后的图片在打包后都会在根目录下,所以/images/logo.jpg可以生效。
普通页面配置
生成当前页面侧边栏
在普通页面的中输入sidebar: auto就会自动根据标题大小生成侧边目录。sidebarDepth: 2,用来控制侧边目录的深度,默认是2。
---
sidebar: auto
sidebarDepth: 2
---
多个页面公用侧边栏
有些博客的内容较多,需要分成很多期来讲,这种情况就可以在全局配置里面对同一路由开头下的页面公用侧边栏。
在/docs/.vuepress/config.ts中配置sidebar,我们这边配置了/project/chatgpt-assistant/
开头的路由都应用相同的侧边栏,其中有四项分别对于图3中的项目介绍,第八期,第九期,第十期。
export default defineUserConfig({
    theme: defaultTheme({
        sidebar: {
            '/project/chatgpt-assistant/': [
                {text: '项目介绍', link: '/project/chatgpt-assistant/'},
                {text: '第八期 websocket+stream请求+proxy', link: '/project/chatgpt-assistant/chapter8/'},
                {text: '第九期 Vue3/ElementUI Plus实现聊天面板', link: '/project/chatgpt-assistant/chapter9/'},
                {text: '第十期 消息发送和markdown显示消息记录', link: '/project/chatgpt-assistant/chapter10/'}
            ]
        }
    })
})
如果你想把第八期和第九期何在一个目录下面,你可以这样。
'/project/chatgpt-assistant/'
:
[
    {text: '项目介绍', link: '/project/chatgpt-assistant/'},
    {
        text: '第八期第九期',
        children: ['/project/chatgpt-assistant/chapter8/', '/project/chatgpt-assistant/chapter9/']
    },
    {text: '第十期 消息发送和markdown显示消息记录', link: '/project/chatgpt-assistant/chapter10/'}
]
效果如下
可以看见第八期和第九期被合并了。配置导航栏
下拉菜单
在导航栏中可以配置菜单,点击菜单就可以跳转到自己写的博客。下面演示配置下拉菜单。
下面这个配置会在导航栏中多一个下拉菜单工具分享,该下路菜单里面又包含三个子菜单如图5所示。
export default defineUserConfig({

    theme: defaultTheme({
        navbar: [
            {
                text: '工具分享',
                children: [
                    {text: '私有ChatGPT搭建', link: '/tools/chatgpt/'},
                    {text: '远程开发环境搭建', link: '/tools/remote-develop/'},
                    {text: 'vue-press2搭建博客', link: '/tools/vue-press2/'},

                ]
            },
        ],
    })
})
下拉菜单分组
要实现下拉菜单中分组,需要再嵌套一层菜单配置。下面的配置多了一个下拉菜单知识分享。知识分享中包含两个分组spring boot技巧和jpa
。通过观察你可以发现没有link属性的菜单项配置就是下拉菜单或者分组了。像知识分享和工具分享
这两个都没有link,又由于它们是位于第一层所以就被识别为下拉菜单。spring boot技巧和jpa两个菜单配置是属于子菜单且没有link属性,那它们就是分组菜单了。
export default defineUserConfig({

    theme: defaultTheme({
        navbar: [
            {
                text: '工具分享',
                children: [
                    {text: '私有ChatGPT搭建', link: '/tools/chatgpt/'},
                    {text: '远程开发环境搭建', link: '/tools/remote-develop/'},
                    {text: 'vue-press2搭建博客', link: '/tools/vue-press2/'},
                ]
            },
            {
                text: '知识分享',
                children: [
                    {
                        text: 'spring boot技巧',
                        children: [
                            {text: 'aop', link: '/knowledge/spring/aop/'}, {
                                text: '如何发送http请求各种参数',
                                link: '/knowledge/spring/http/'
                            }
                        ]
                    },
                    {
                        text: 'jpa',
                        children: [
                            {
                                text: 'hibernate',
                                link: '/knowledge/jpa/hibernate/'
                            }
                        ]
                    }
                ]
            }
        ],
    })
})